What is AWS EC2
Amazon Elastic Compute Cloud (Amazon EC2) provides scalable computing capacity in the Amazon Web Services(AWS) cloud. Using Amazon EC2 eliminates your need to invest in hardware up front, so you can develop and deploy applications faster.
Amazon EC2 allows us to get compute power in cloud through the launching of virtual servers called instances. When you launch an instance, you can make use of the compute as you wish, just as you would with an on-premises server. Because you are paying for the computing power of the instance, you are charged per hour while the instance is running. When you stop the instance, you are no longer charged.
There are two main things when launching instances on AWS :
- the amount of virtual hardware dedicated to the instance and
- the software loaded on the instance.
These two dimensions of new instances are controlled, respectively, by the
Instance Type and the AMI - Amazon Machine Image.Prerequisites
Before starting up this exercise we need below setup as prerequisites.
- AWS account – Must have to open one AWS account to do this exercise.
- SSL Client – PuTTY – This should be installed in Local M/C including
PuTTYgen,PUTTY,Pageantapplications. Full set of applications related to PutTTY can be downloaded from this link. Just unzip to a convenient location.
So, let’s get started by creating an AWS EC2 instance.
Steps to Create EC2 Instance
- Login to AWS console and open EC2 home screen – Once log in and click Services menu in the top left corner of the home screen, we will need to click the EC2 Link under compute section. The EC2 landing page will look like :
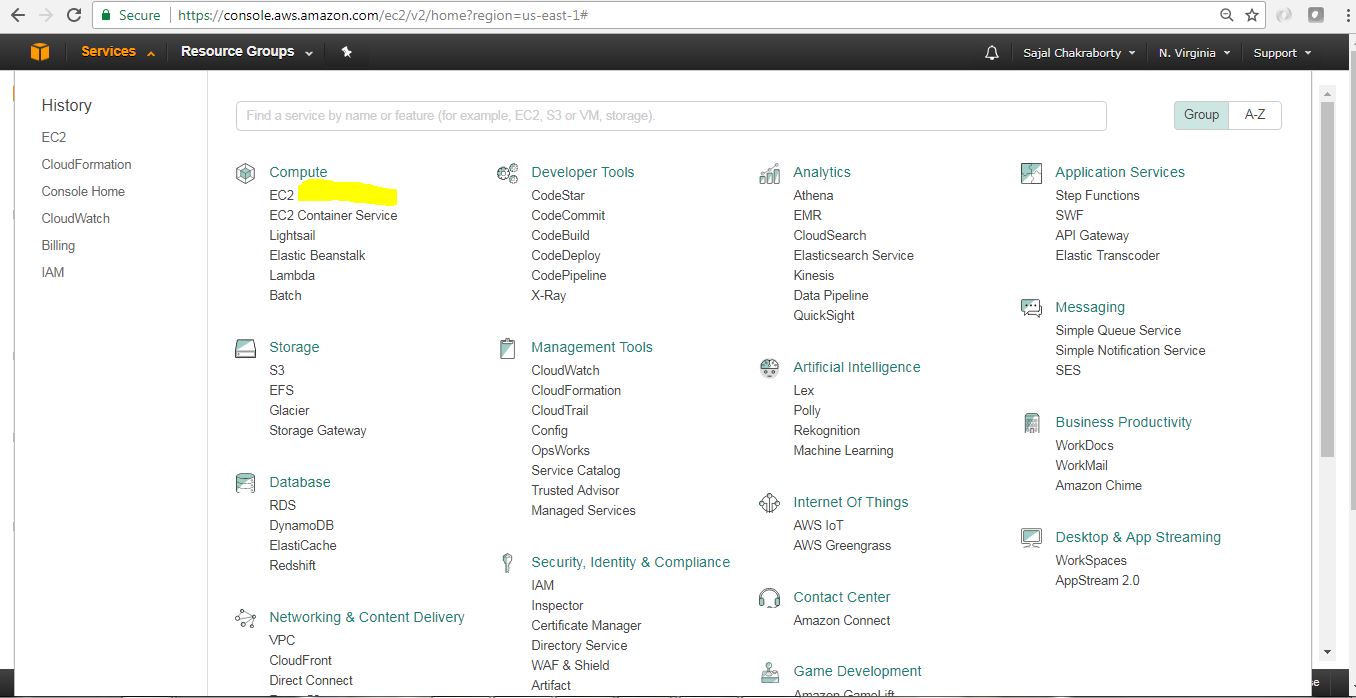
Figure 1.0 : Services Menu with Ec2 Link This is how EC2 Home page looks like. This is the place we land when we click EC2 link in the previous step (Figure 1.0).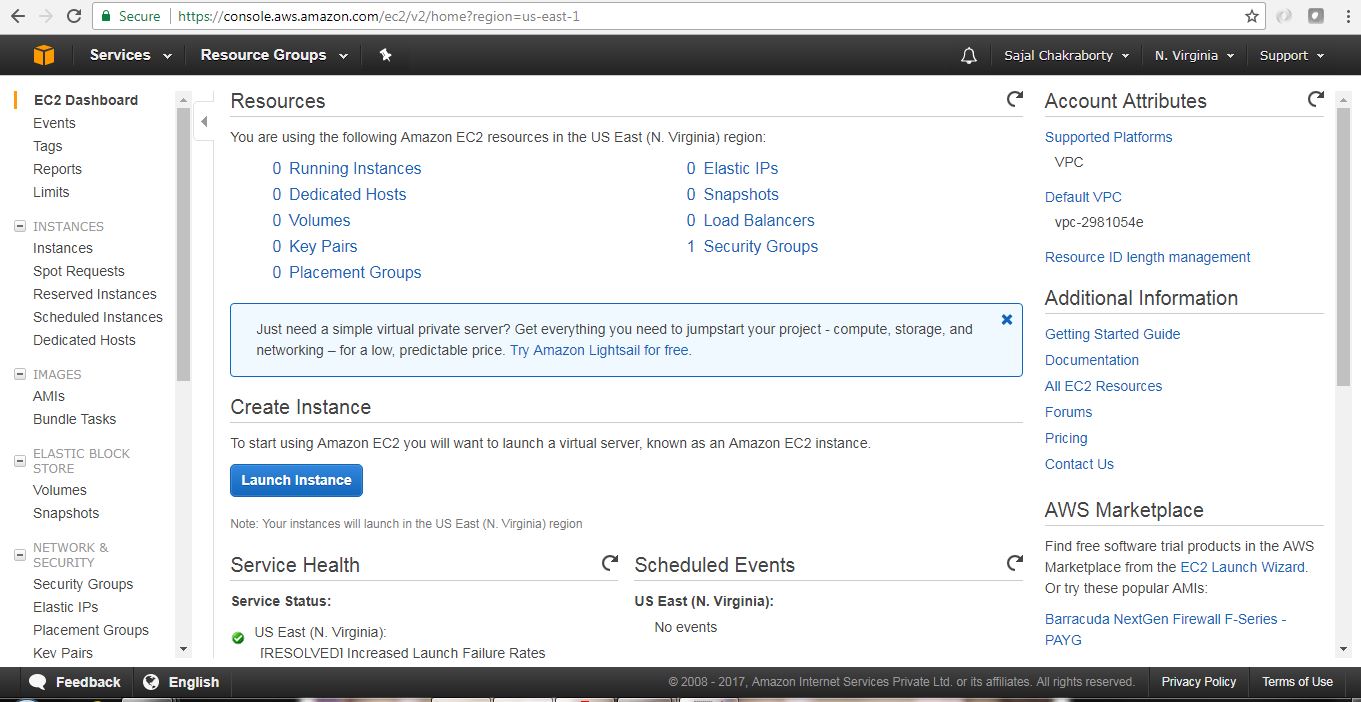
Figure 1.1 : EC2 Home Screen - Launch a new virtual server Now we need to click the
Launch Instancebutton from the EC2 Home page.This will start the instance creation wizard which will guide us through the following steps mainly:- Selecting an OS
- Choosing the size of your virtual server
- Choosing the Extra attached storage we need for this instance
- Configuring details
- Reviewing your input and selecting a key pair for SSH
- Select AMI – AMI stands for Amazon Machine Images, which is kind of a blue print of the instance that we will create, it tells about the Operating System of the Instance as well as the basic softwares that will be pre-installed. So in this step, while choosing AMI, we are choosing the underlying Operating System(OS) and the preinstalled software bundles that would be available in the instance upfront.We need to choose
AMIbased on our need. We will choose only those AMIs which falls underFree Tire Eligibletype. An AMI is the basis your virtual server starts from. AMIs are offered by AWS, by thirdparty providers, and by the community. We can also create custom AMI based on our need. Some AMIs are chargeable. Here for this exercise we will chooseUbuntu Server 16.04 LTS(HVM)AMI.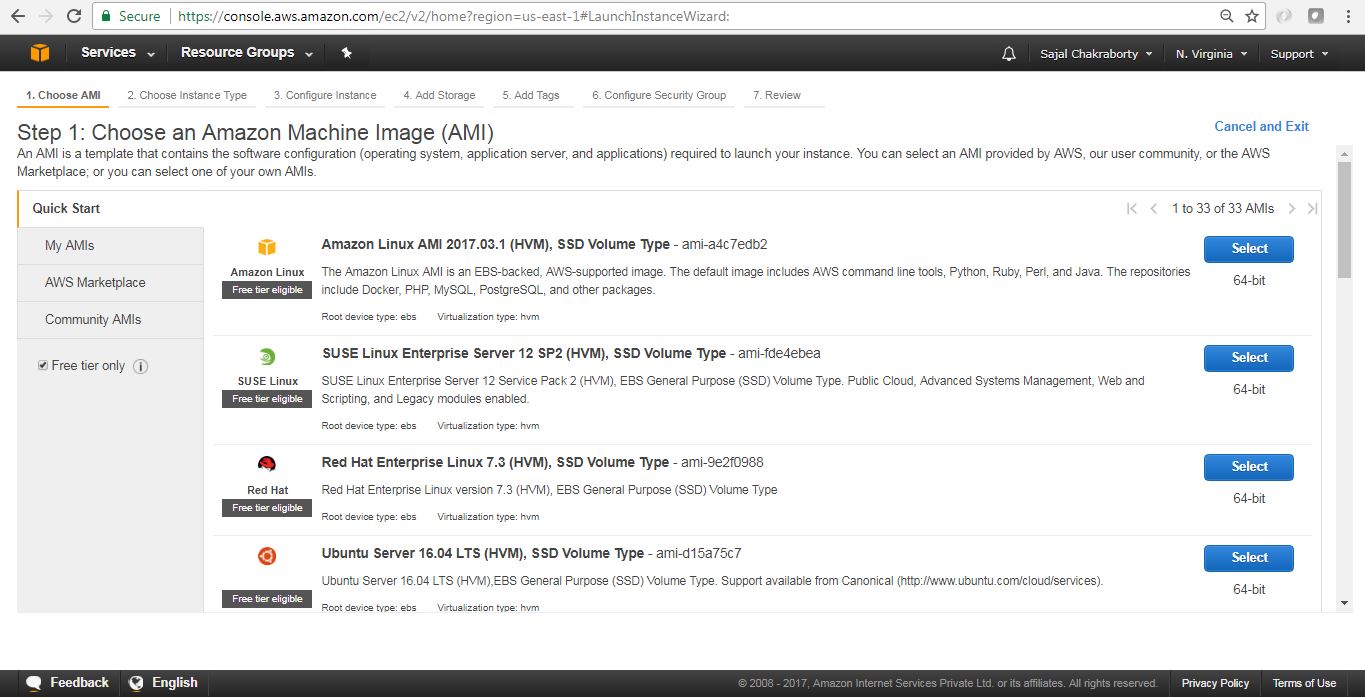
Figure 3.0 : Select AMI Click on theSelectbutton beside the AMI to proceed with the sect step. - Select Instance Type – It’s now time to choose the computing power needed for your virtual server. Instance Type indicates the computing power of the instance by allocating the amount of virtual hardware dedicated to the instance. On AWS, computing power is classified into instance types. An instance type primarily describes the number of
vCPUsand the amount ofmemoryan instance will be allocated to once created. We will choose only the Free Tire Eligible Instance Type (t2.micro) which provides 1 vCPU and 1 GB of Memory. AWS has already defined many instance types, we will now choose thet2.microinstance type for this exercise. Once instance type is selected, click on buttonNext: Configure Instance Detailsin the bottom right corner of the page to proceed with the next steps.
Figure 4.0 : Instance Type Selection - Instance Details page This will look like below. Here we will take all the default values and proceed with clicking
Next: Add Storagebutton at the bottom right corner of the page. Before proceeding to the next section please note few important things that we can modify here:- Number of Instances we are going to create in this wizard.
- We can select the Spot Instance option, Spot Instances are idle compute capacity that AWS makes available based on bid prices from customers.
- Networking/Subnet/Public IP setting – This is the VPC under which the instance would be created, We can choose existing VPC, or create a new VPC here. VPC is itself a large topic which is out of scope of this article. Please follow official AWS documentation for the same.
- Also we can configure, Shutdown Behavior, Termination Protection Flag(To avoid accidental Termination), Tenancy(Common vs dedicated H/W), Cloud Watch Detailed Monitoring. Here some of them are chargeable option.
We can Change those later also once the Instance has been created.Now we will proceed to addEBS (Elastic Block Store)volume details associated with this instance. Configure Instance Details screen will look like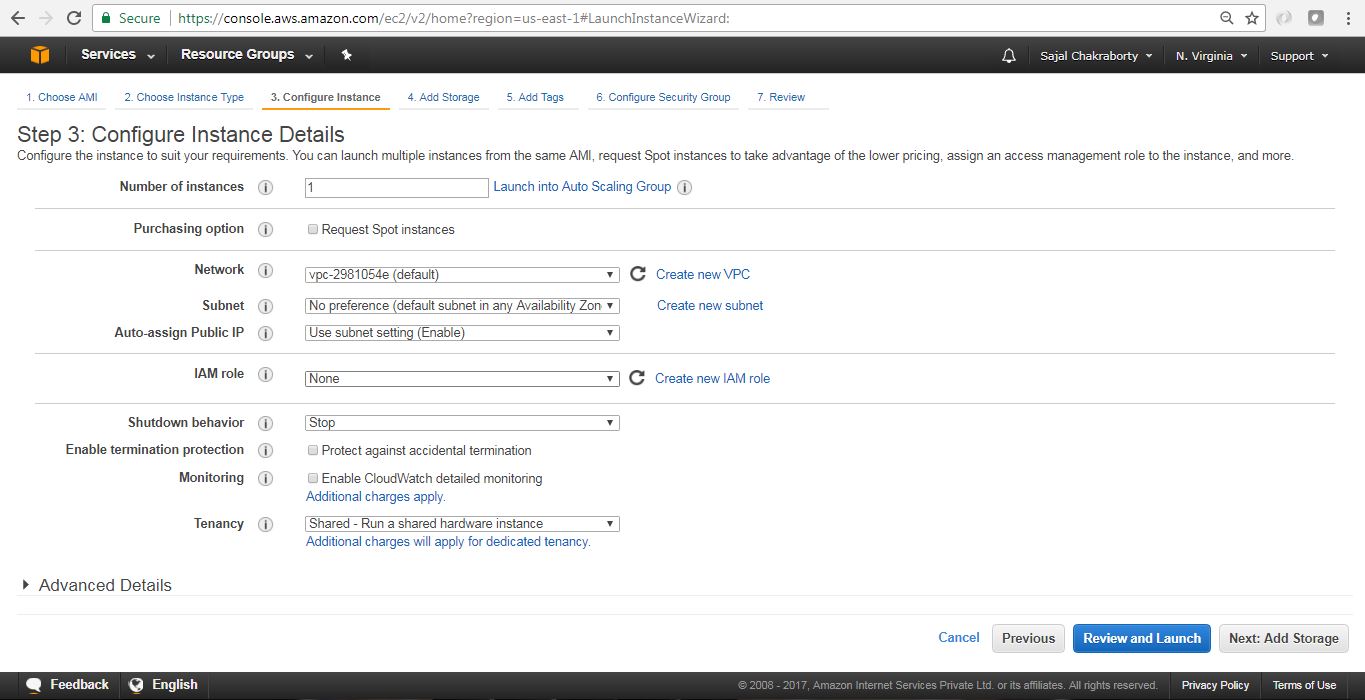
Figure 5.0 : Configure Instance Details - Add EBS Storage –
EBSstands forElastic block storage. It is basically network-attached storage attached your virtual server. This page will help us to configure Storage that will be associated with the EC2 instance that we are going to launch. We will choose default values to avoid extra cost. Make sure you choose the capacity which falls under Free Tire Eligibility to avoid incurring extra cost.Review and clickNext: Add Tagsbutton at the bottom right corner of the page to proceed. The EBS volume configuration page will look like
Figure 6.0 : EBS volume configuration - Add Tags – Tags are kind of an identifier of any AWS resources, with Tags we can easily locate the resource in future and also it helps us to classify the resources. Tags help you to organize resources on AWS. We can add max 50 tags to a particular resources. It is a simple Key value pair associated with the resource.In this step we will add one tag
Namewith valuemyfirstec2server. Once tag is created, we will proceed with configuring security group by clicking the “Next: Configure Security Group” button at the bottom right corner of the page. Add Tag screen will look like: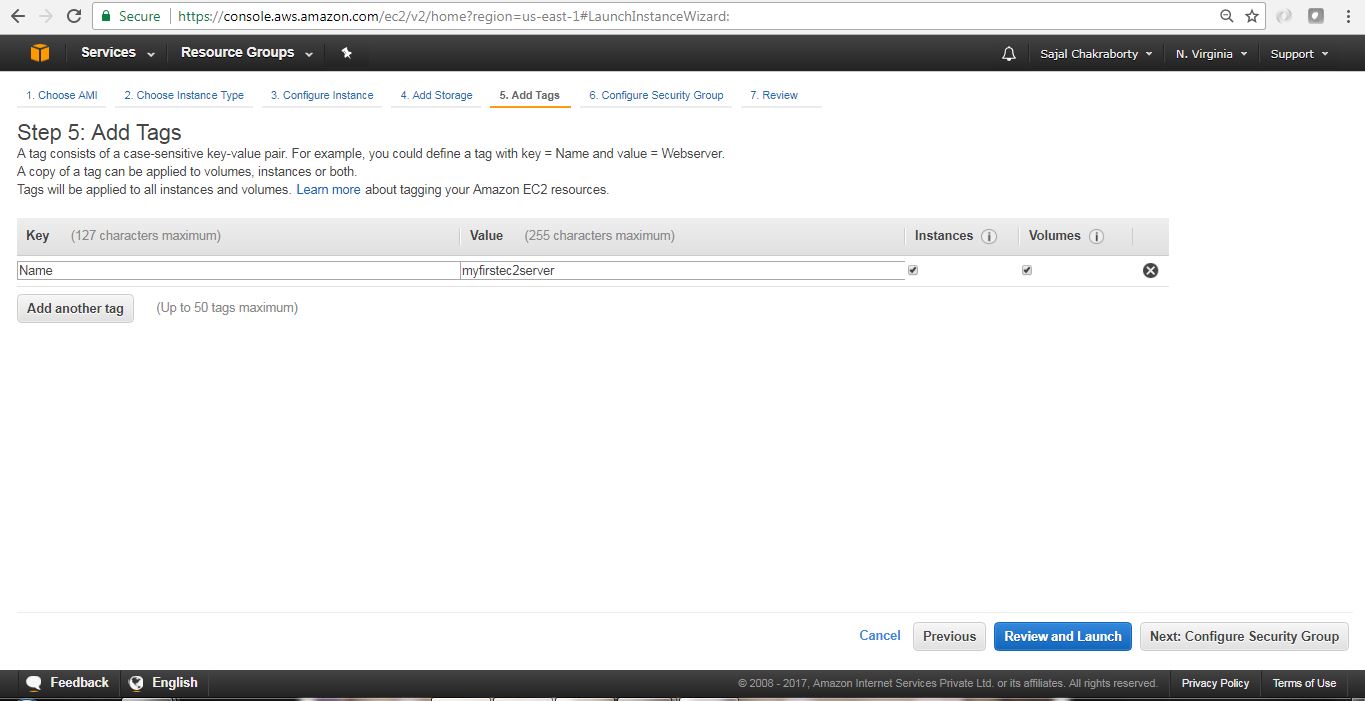
Figure 7.0 : EC2 Add Tag - Configure Security Group – This section is to define a firewall that helps to secure our virtual server. A security group is a virtual stateful firewall that controls inbound and outbound network traffic to AWS resources and Amazon EC2 instances. All Amazon EC2 instances must be launched into a security group. If a security group is not specified at launch, then the instance will be launched into the default security group for the Amazon VPC. The default security group allows communication between all resources within the security group, allows all outbound traffic, and denies all other traffic.In this screen we can create/reuse security groups based on our need.In this example, assuming that we don’t have any security group created, We will choose the default option and will proceed. To proceed with next page, we will click on the
Review and Launchbutton at the bottom right corner of the page. The Security Group configuration screen will look like:
Figure 8.0 : Security Group Configuration Screen - Review and associate Key pair – We will now review all the configurations that we have selected so far in this screen and to proceed further we will click on
Launchbutton at the bottom right corner of the page.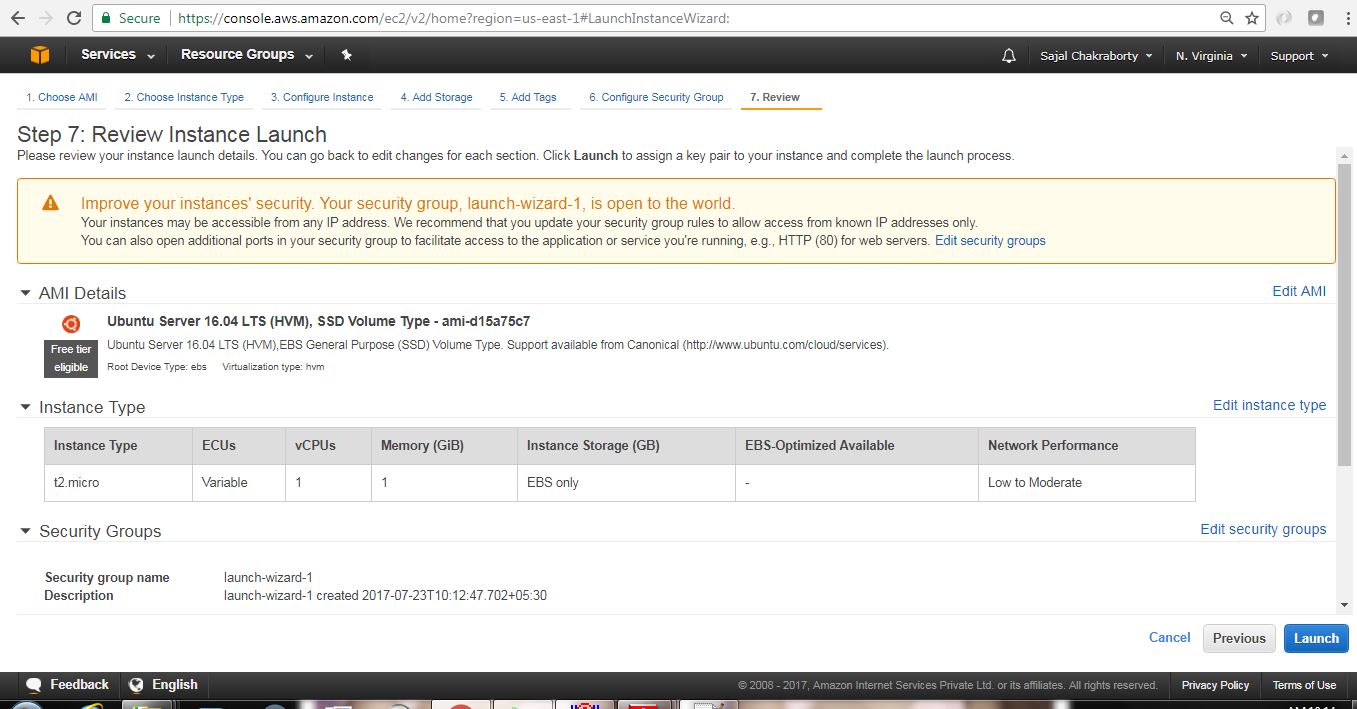
Figure 9.0 : Review Launch configurations Once we proceed, we will have to select the Key pair which will be used for authentication while connecting with the instance. - Create a new Key Pair -Logging in to your virtual server requires a key. We use a key instead of a password to authenticate. We will create a new Key pair by choosing appropriate option from drop down and will have to provide a name of the key-pair file and then we need to download that file by clicking the
Download Key Pairbutton in the page. A key is much more secure than a password, and using keys for SSH is mandatory for virtual servers running Linux on AWS. In our case we have chosen Ubuntu Linux, so creating a Key-pair is a must for us here. In this step if we create a new Key-pair, we get one file of type.pemextension. Here are the steps of creating the Key pairs. Instructions are self describing and very easy to follow.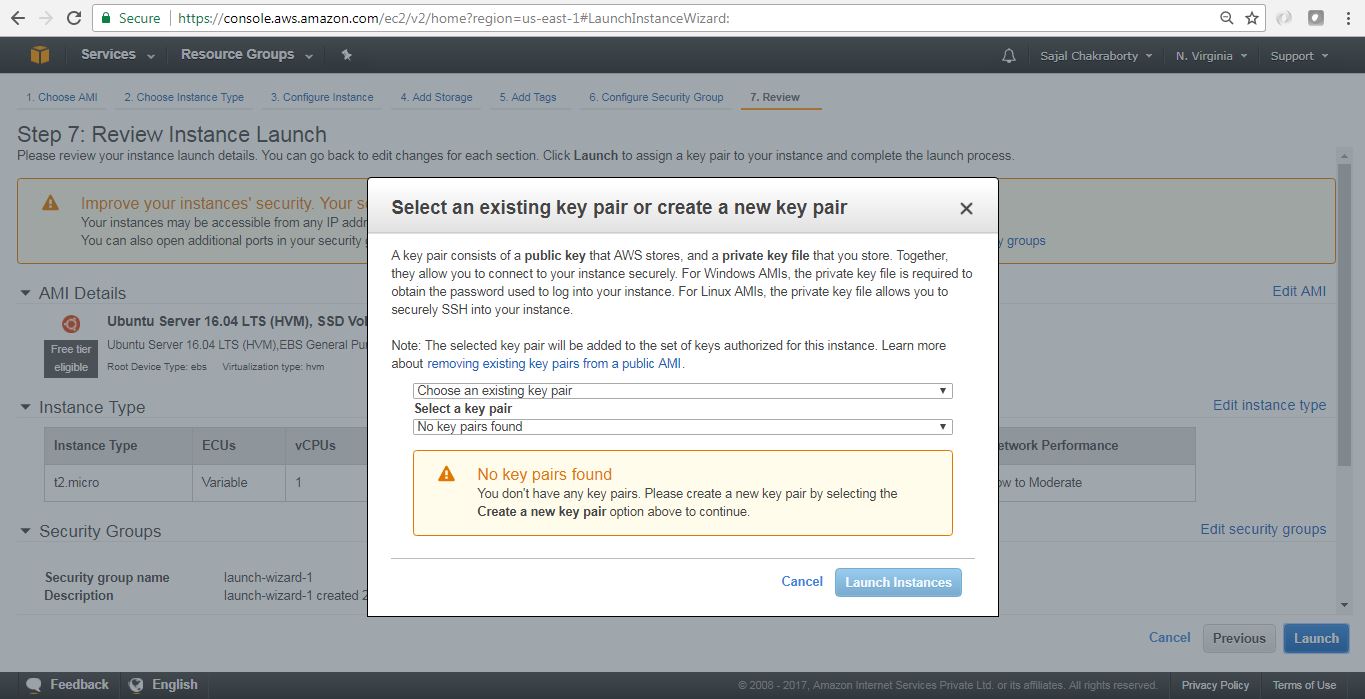
Figure 10.0 : Key Pair Creation Step 1 
Figure 10.1 : Key Pair Creation Step 2 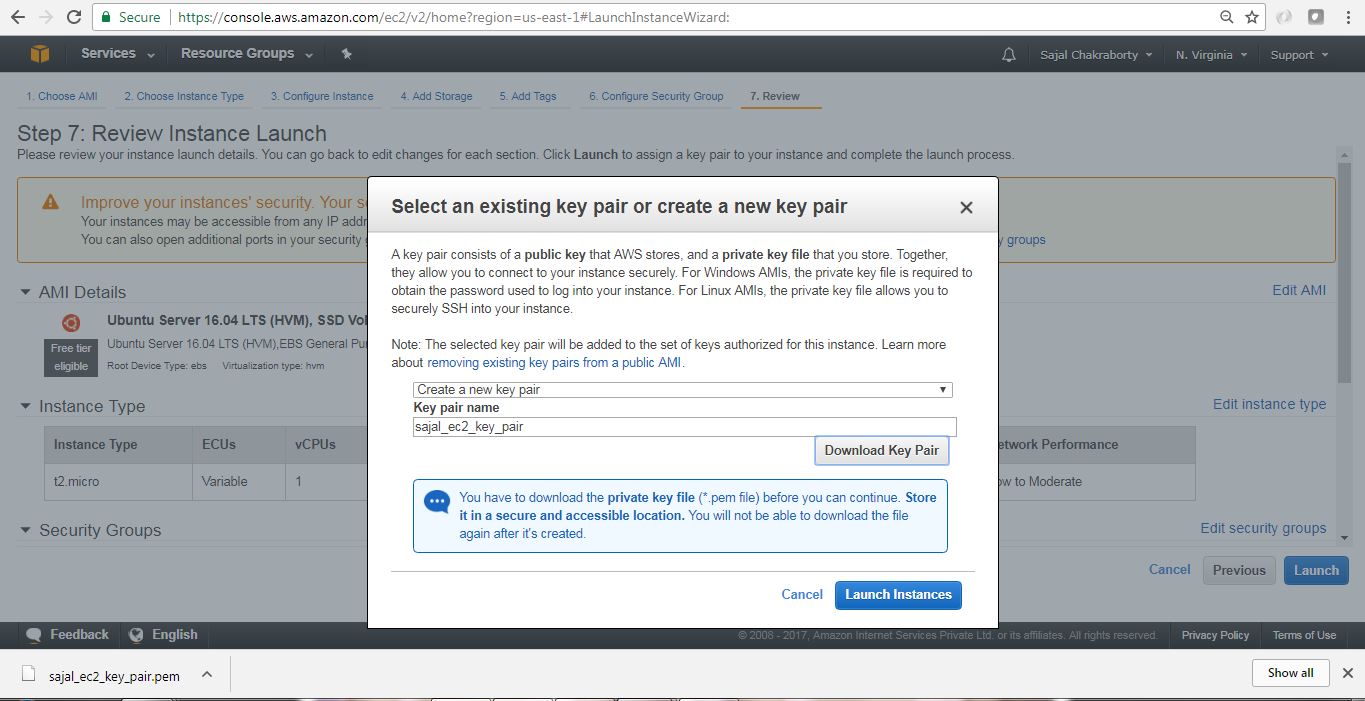
Figure 10.2 : Key Pair Creation Step 3 Once we have created and downloaded the Key pair we need to proceed by clickingLaunch Instancesbutton in the Figure 10.2 page. - Finish Creation Process – Once we have clicked
Launch Instancesbutton in the last page where we have created Key pairs, we will start the actual instance creation step as below.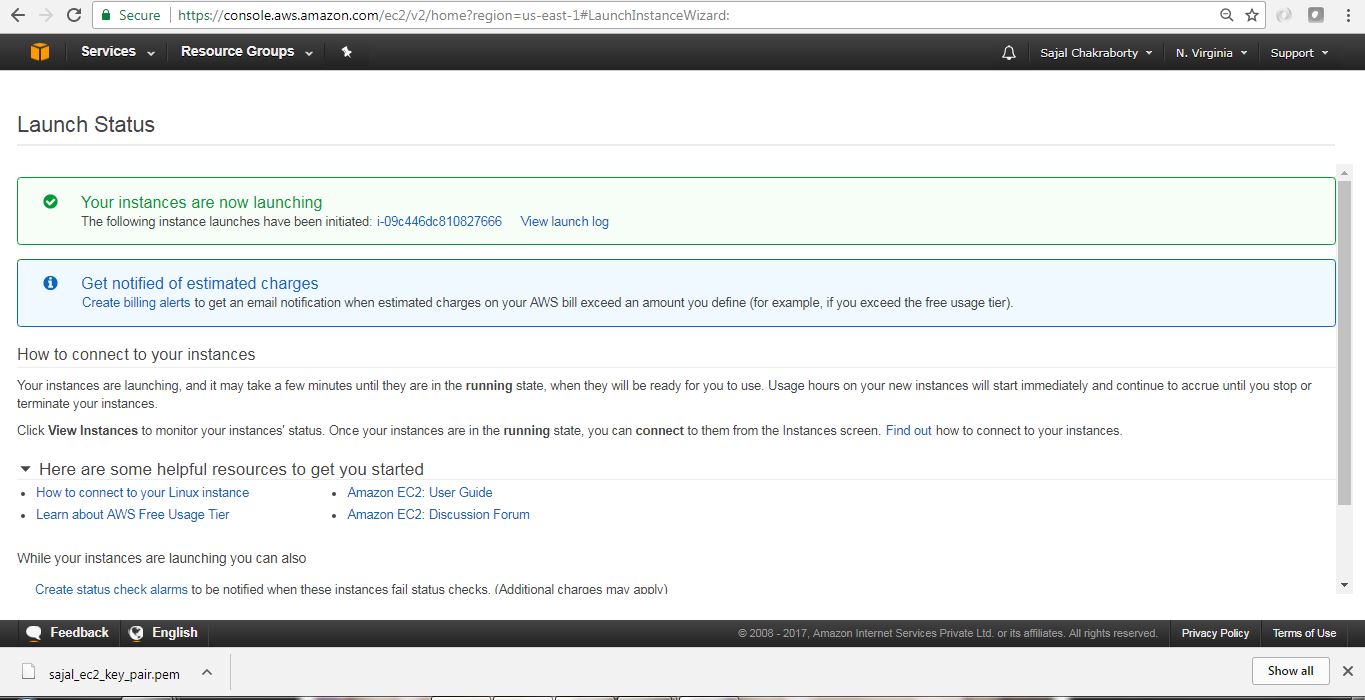
Figure 11.0 : Instance Creating Last step Finally this is the screen where we will see the details of the instance that we have just created.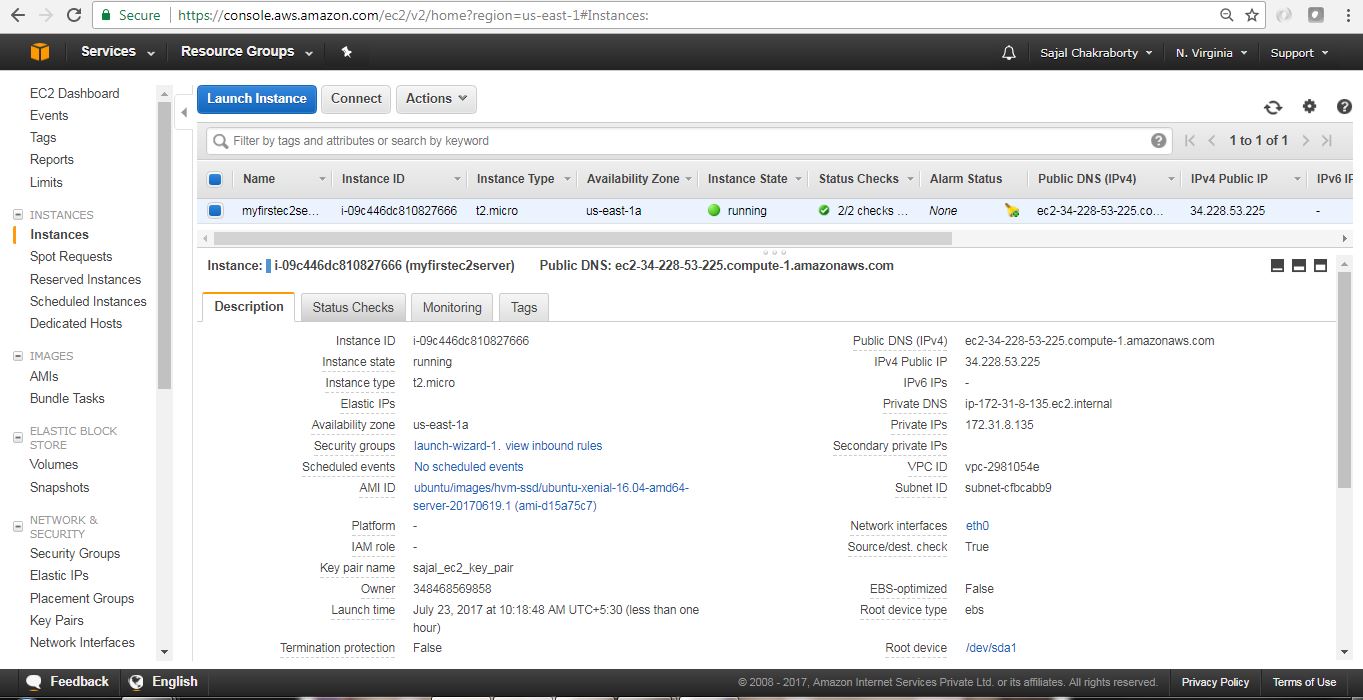
Figure 11.1 : Instance Created
Now we have created our first EC2 Instance. Next we will connect to this instance from our local workstation and will install one software (Linkchecker) in EC2 instance and will learn to use that software.
Connect to EC2 Instance
AWS has provided a very good documentation in this regard. Here are the basic steps for configuring and connecting to the instance through putty.
- AWS provided steps – In the instance details page, we can click
Connectbutton to view the pop up like this. This will give us the required steps and information regarding connecting to the instance, Also we can go to the actual AWS documentation by going to the link in the pop up –connect using PuTTYlink.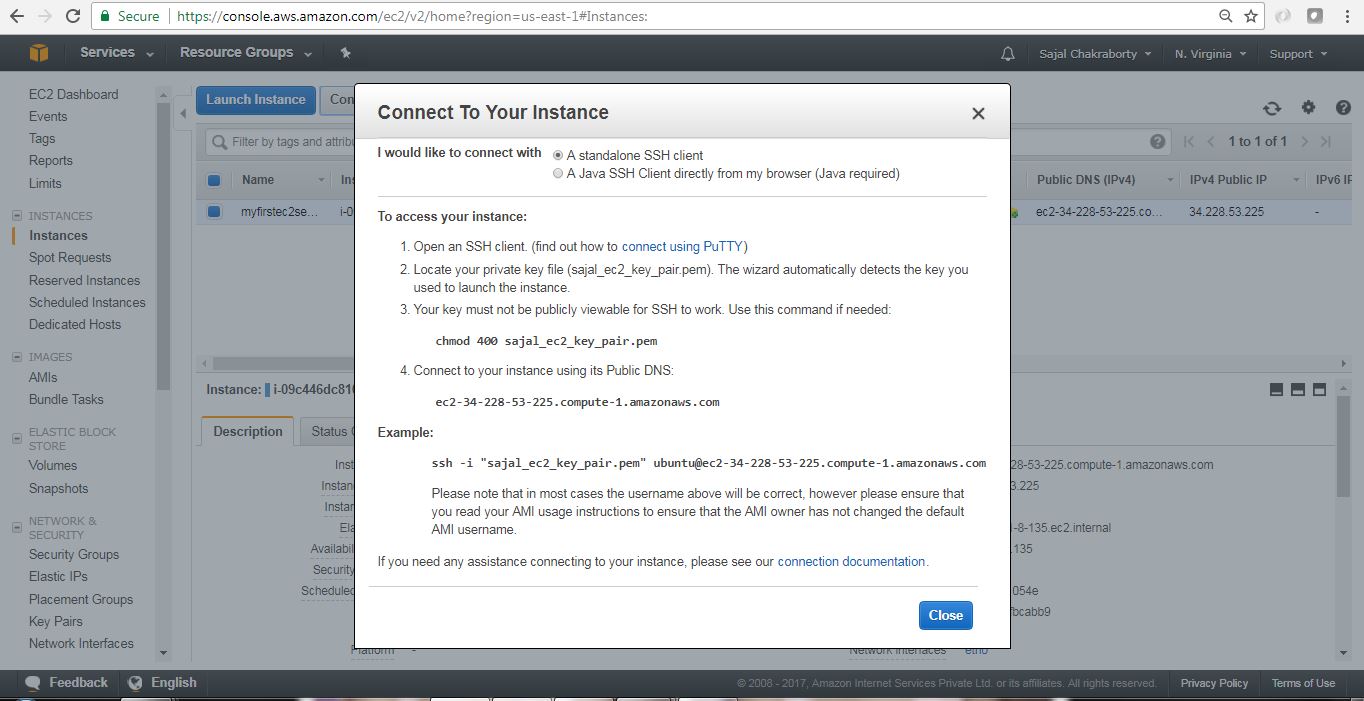
Connect Pop up Details 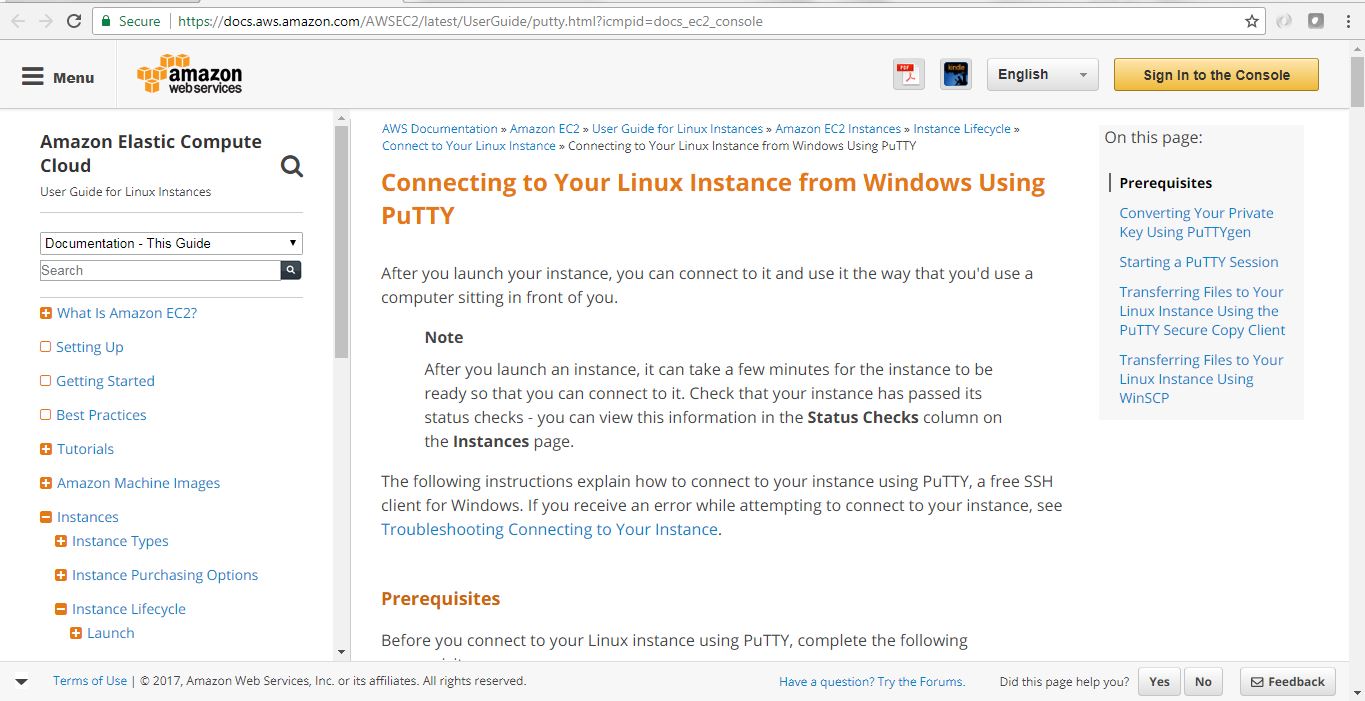
Official AWS steps for PuTTY in Windows - Use PuTTYgen to convert the Key File – Now we need the
.pemfile we downloaded while creating EC2 instance. Now we will open PuTTYgen app to convert this.pemfile to.pkkfile which will be used by PuTTY to login to the instance terminal.In the PuTTYgen application follow the below step to convert the.pemfile.- Run the application PuTTYgen.
- Select RSA radio button under Type of Key to Generate.
- Click Load.
- Because PuTTYgen displays only
*.pkkfiles, you need to switch the file extension of the File Name field to All Files. - Select the
.pemfile [in my case it issajal_ec2_key_pair.pem], and click Open. - Confirm the dialog box.
- Click Save Private Key. Ignore the warning about saving the key without a passphrase.
Here are few screen shots for those steps.
PuTTYgen Steps 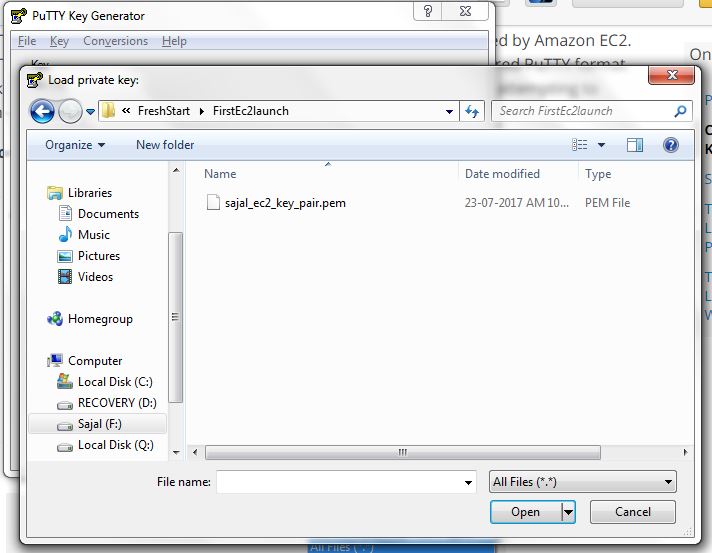
PuTTYgen Steps 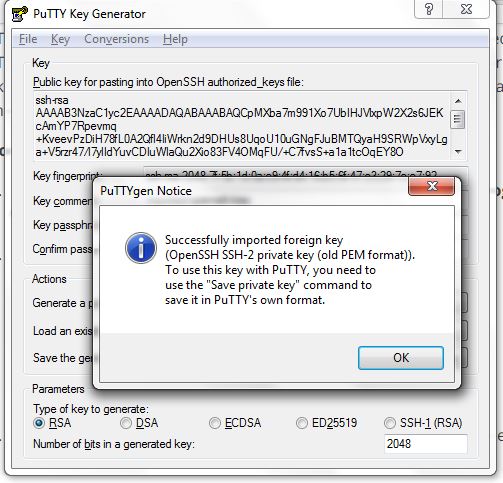
PuTTYgen Steps 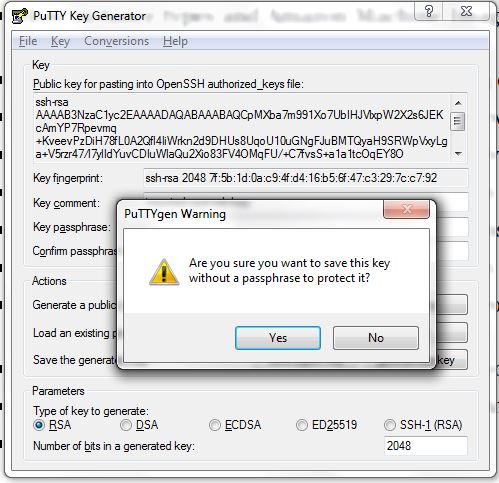
PuTTYgen Steps 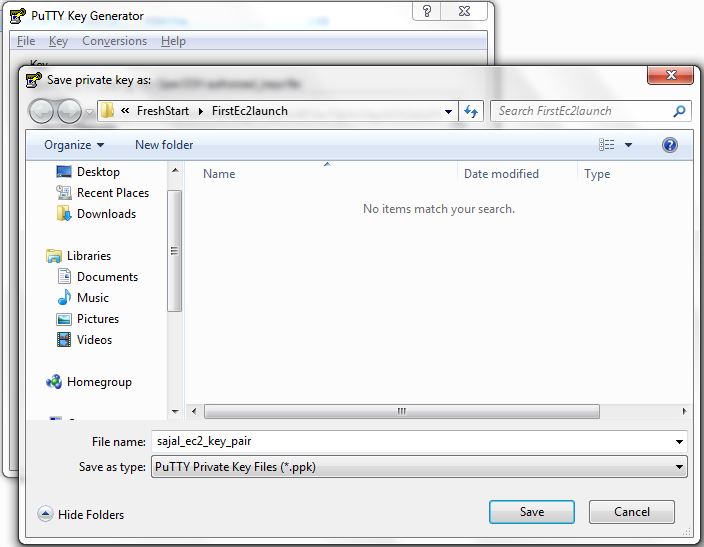
PuTTYgen Steps - Start
Pageant.EXEand select the.pkkfile. Once Pageant stated we will need to add the Key by selecting the.pkkfile we have already created. Here are the sample steps for this.
PAGENT step 1 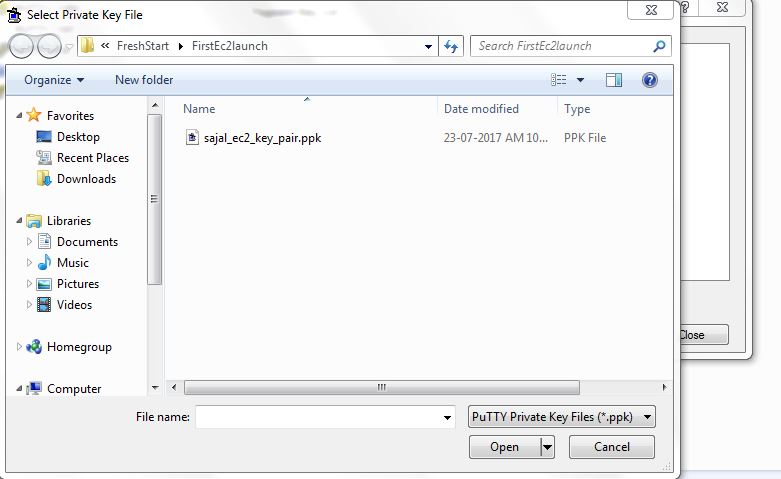
PAGENT step 1 - Login to EC2 Instance – Once we have
Pageant.exerunning and added the key.pkkfile, OpenPutty.exeand give public IP address of the Instance for connect. We can get the public ip fro the instance details screen in the AWS EC2 page. Now we need to give user name asubuntuin thelogin asprompt. If everything goes well this would be authenticated and log in to the instance.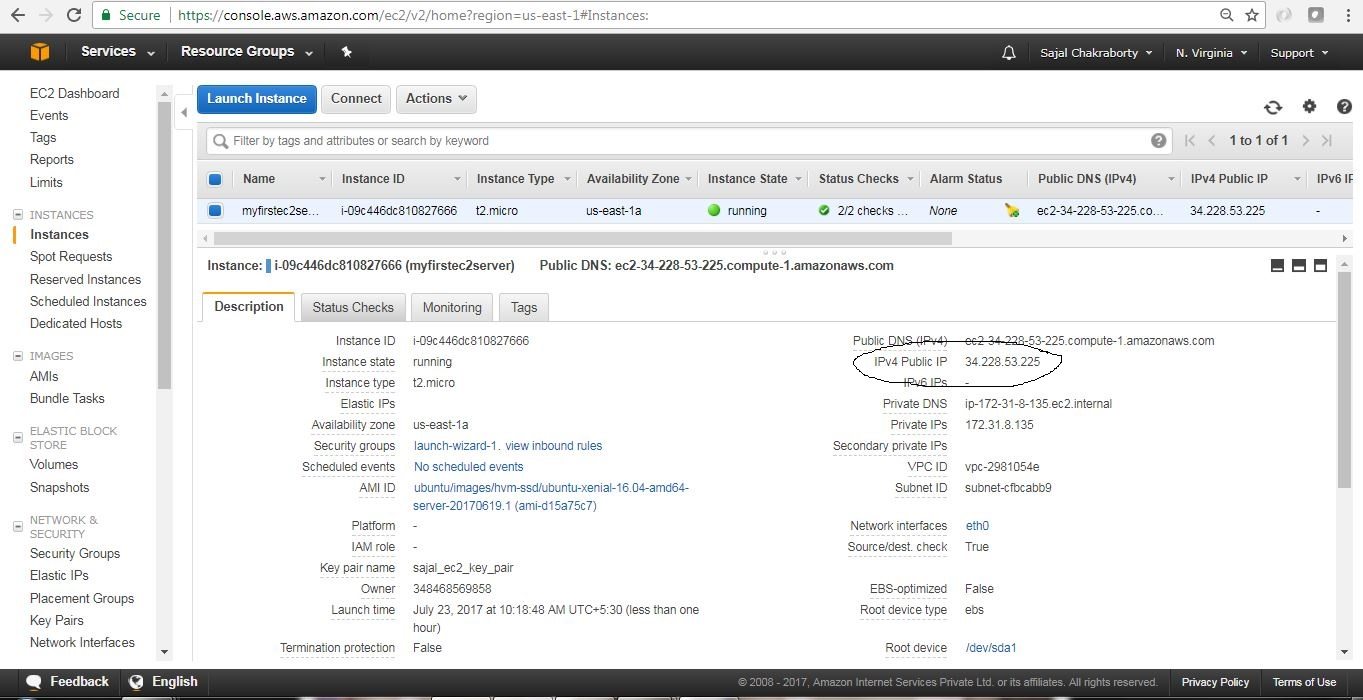
Public IP address for AWS console 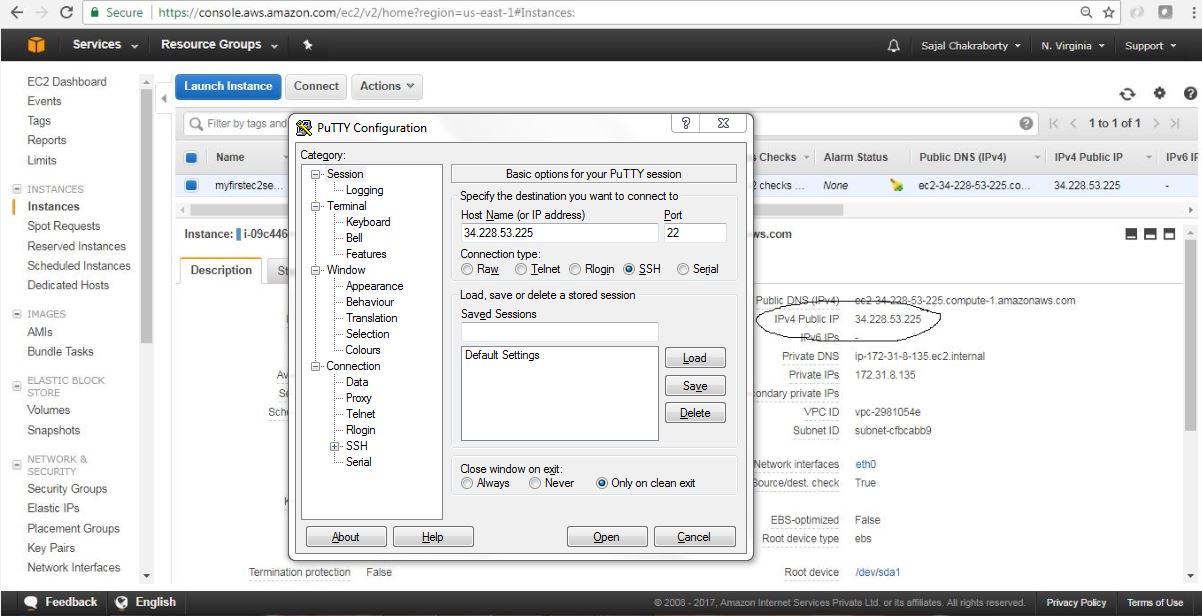
Putty With Public IP 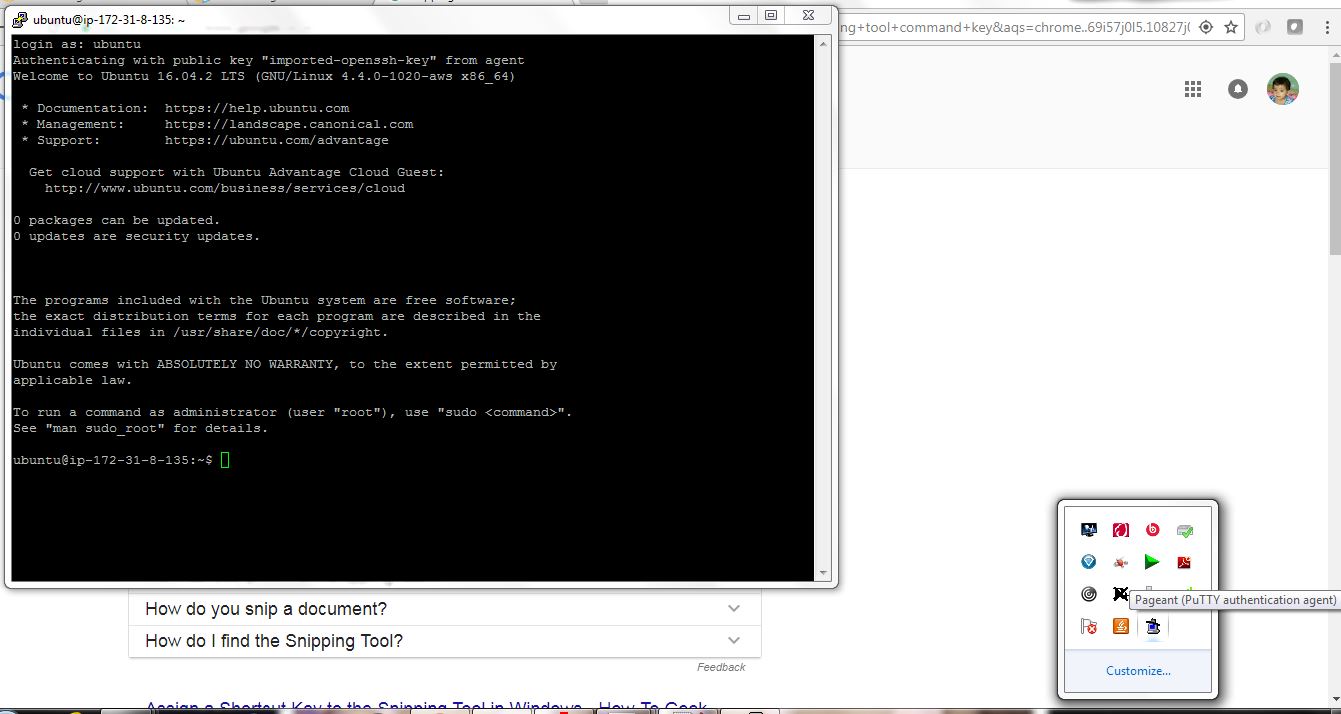
Putty Login
So now we are able to SSH connect to EC2 instance through putty.
Installing softwares on EC2 Instance
Now we will install
linkchecker software and will use that to do some testing.- open putty and login
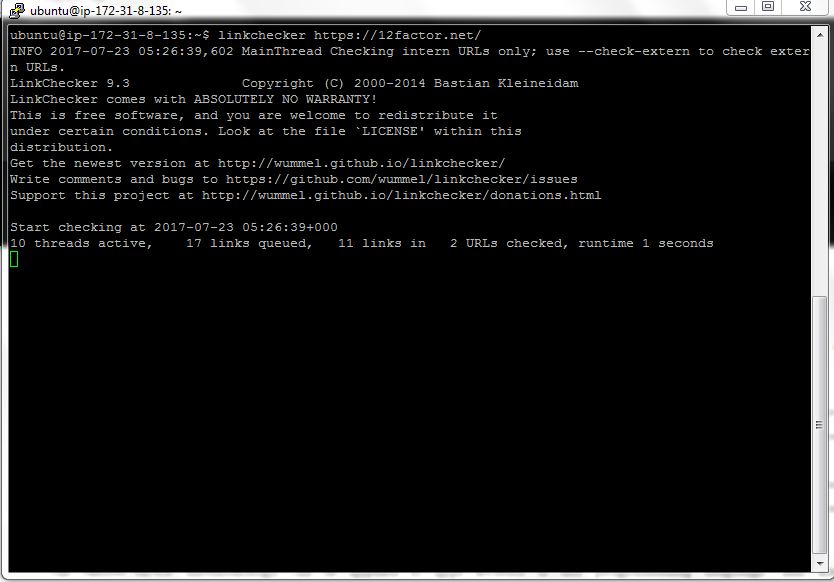
tithe terminal as described above and enter the commandsudo apt-get install linkchecker -yin the terminal. This will install the linkchecker software in the instance. - Now test the linkchecker by simply providing some URL like
linkchecker https://...
Here is the sample screen related to link checker install and usage.

Checking Logs on EC2 Instance
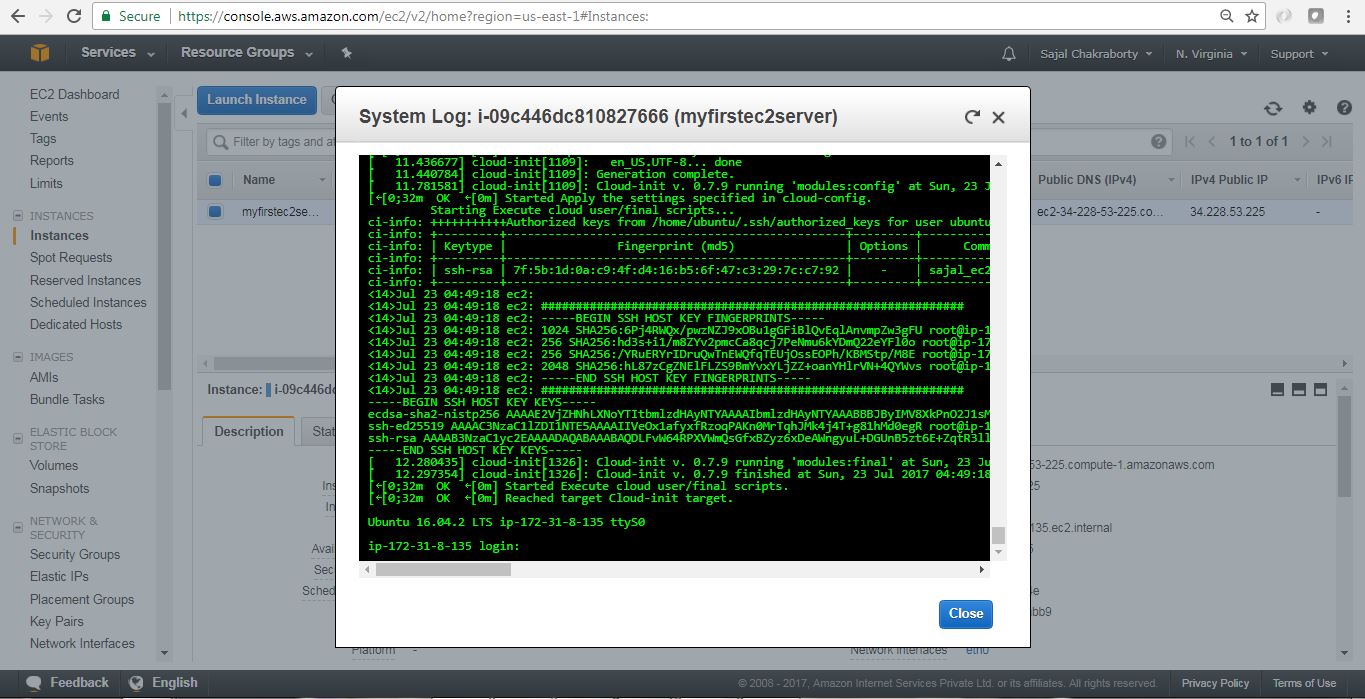
We can view the console log of EC2 instance from the AWS console itself by clicking on the Actions menu, choose Instance Settings > Get System Log. Here is the sample screen looks like:
How to Terminate EC2 Instance
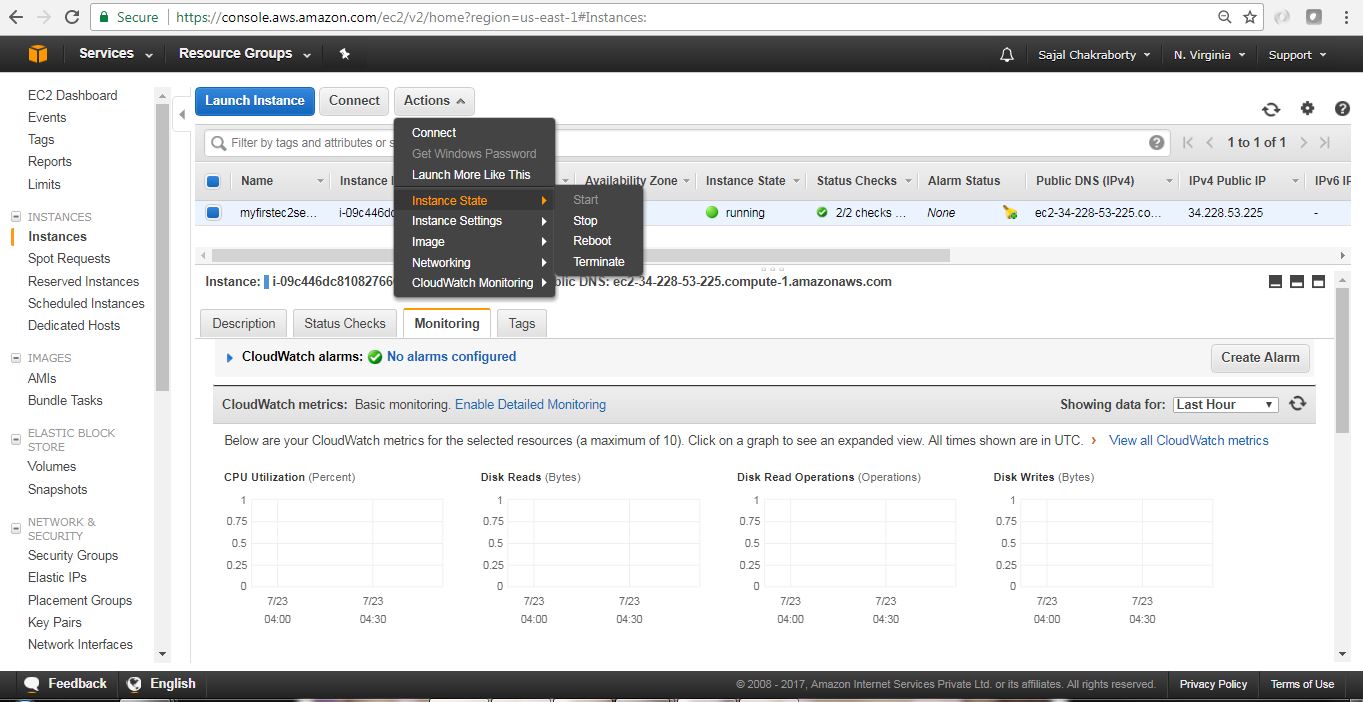
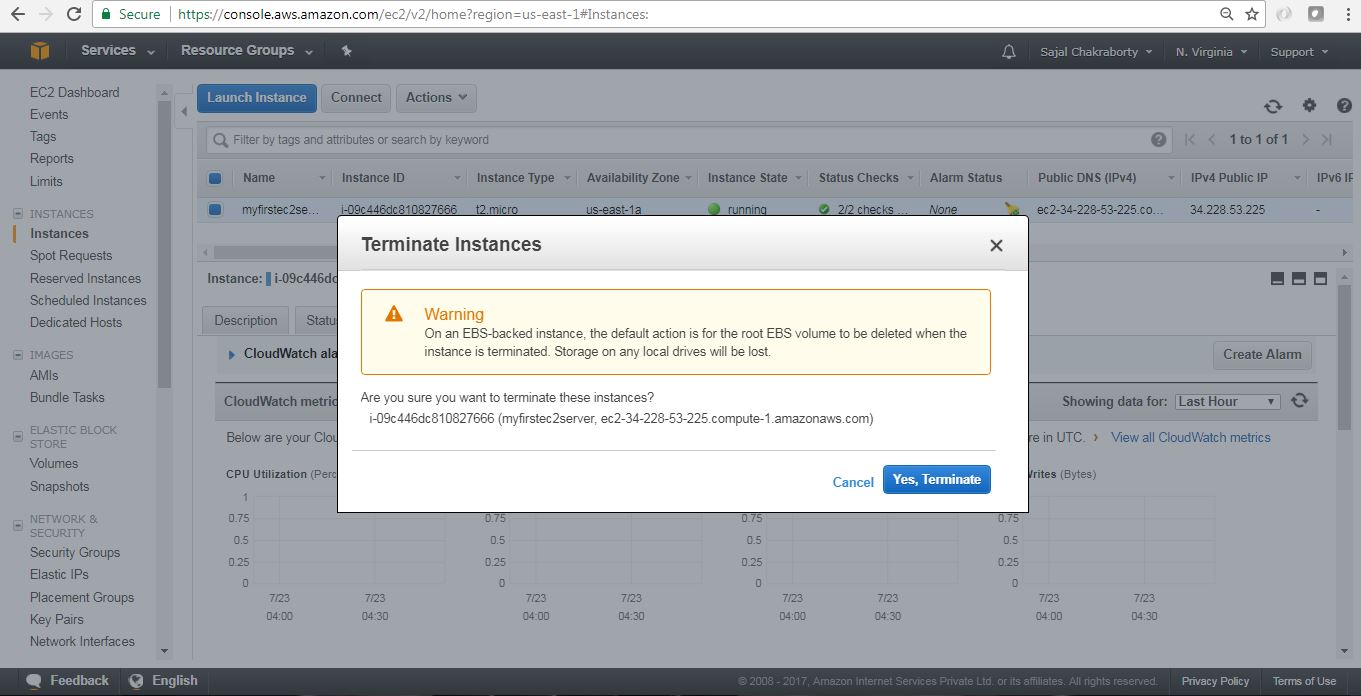
We can terminate EC2 instance by clicking the menu option Actions > Instance State > Terminate.
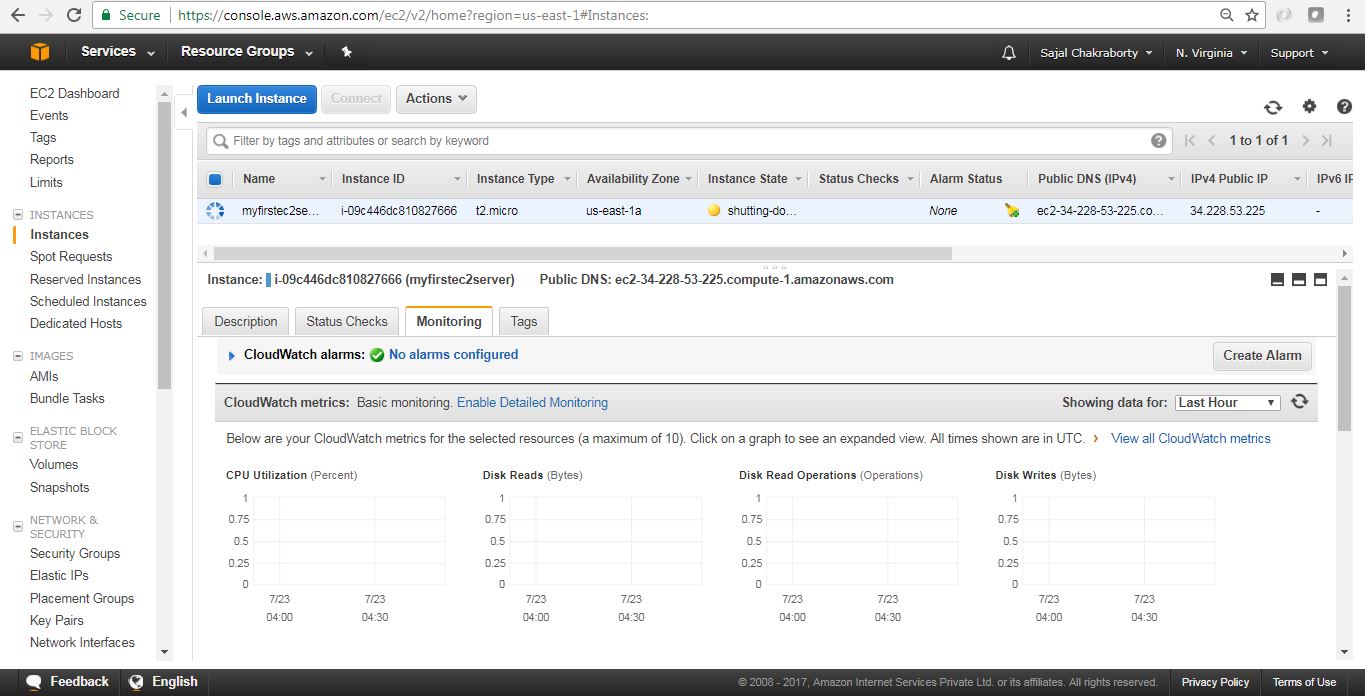
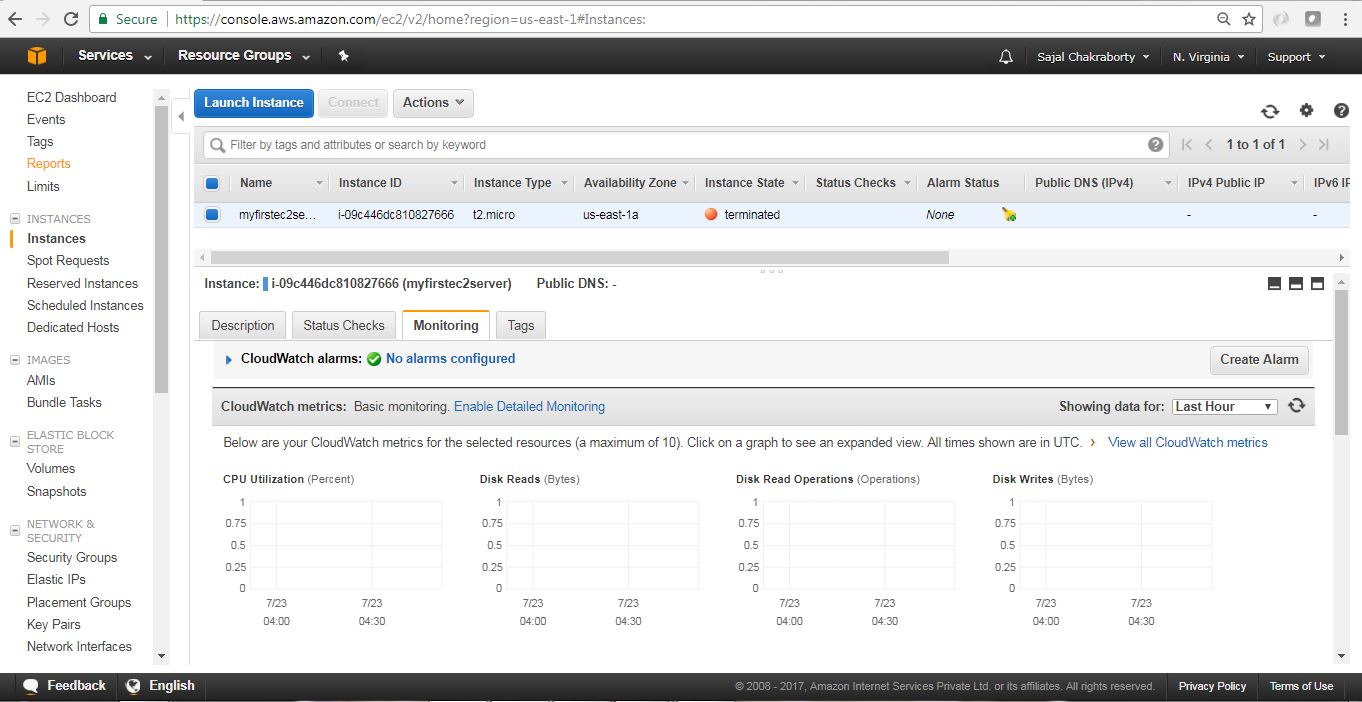
Here are the consequent steps related to termination of the instance. Please note that termination means Deletion/removal of the instance from AWS system. Also we can stop the instance. Please choose accordingly.

 Step 3: Get link to the repository